Showing posts with label polymer clay. Show all posts

Thursday, November 18, 2010

Polymer Clay Smooshers Scavenger Hut.

How would you like a chance to have fun, do some shopping and take a chance to win a prize? You would...well great.

Here is what you need to do......
Go to the world famous Polymer Clay Smooshers Guild Blog http://polymerclaysmooshers.blogspot.com and follow the instructions for our Christmas Scavenger Hunt....There are several ways to win one of the awesome prizes donated by guild members.

Good luck on your hunt; have fun.........
Check out the beautiful prizes you might win..
2010 Smooshers Holiday Scavenger Hunt  Prizes

Monday, July 26, 2010

Introducing CatsWire


Cat's Wire is a very talented artisan who describes herself as a "Bookworm by day, crazy cat lady and hooked on wire in the evening!" She lives in Southern Germany with her Husband and 4 cats.

She is very talented with wire and incorporates polymer clay along with gemstones and beads to make some awesome wearable wire sculptures.

She also is a talented miniaturist and sculpter who uses my favorite medium Polymer Clay to bring her designs to life.

Cat is a proud member of the ArtFire Polymer Clay Smooshers Guild and sells her lovely creations at http://Catswire.artfire.com she writes a very interesting blog http://catswire.blogspot.com/ Check out her sites you won't be disappointed.

Tuesday, June 29, 2010

Introducing Into The Dawn


Dawn of http://IntoTheDawn.Artfire.com is a lovely and talented member of The Polymer Clay Smooshers Guild of ArtFire.

I absolutely love her polymer clay transfer Tarot Card pendants. I think it's such a creative idea.

She also is a very good sculptor, I love the colors and softness of this necklace.

She made this cute ATC for our monthly themed challenge. June's challenge was Ocean. Don't ya just love it?

Take a few minutes to browse her shop at http://Intothedawn.artfire.com you'll be glad you did.

Tuesday, June 8, 2010

Meet Sassy Clay Creations


I would like to show some of the lovely things made by Dori of Http://SassyClayCreations.artfire.com .
I really like pretty things that are useful like this candle holder. I would love to have this as part of my Fall decor.

When I saw this mask in Dori's shop I fell in love with it. I love the whimsical style of it.

I love the texture in this Star and moon pin she made. I think it would make a great piece to add to any jewelry collection.

Not only is Dori a talented lady she is a sweetheart who has organized the Friendship round Robin swap box for our Artfire Polymer Clay Smooshers Guild .

So if you are looking for a unique gift for someone or a special treat for your self I recommend checking out her shop http://SassyClayCreations.artfire.com

Thursday, June 3, 2010

Featuring Colt Pixy


This beautiful Beetle is handmade with polymer clay by the talented artist Star Edwards of http://Coltpixy.artfire.com . She made it for the resent "Bug Challenge" held by the Polymer Clay Smooshers Guild of Artfire.

Above also is the whimsical piece she did for the "flight" challenge

If you like miniatures you will love the beautiful tiny baskets she weaves with polymer clay take a peek at her Artfire shop you'll be glad you did.

Not only is she a wonderful artist she is also the tireless guild master of the Smooshers guild who spends a great amount of time and energy promoting her fellow guild members.

Sunday, April 11, 2010

How to make a cuff bracelet


I wanted to do a work in progress post for anyone interested in making a cuff bracelet or just wondered how they were made. I thought I'd show how I made one.

I am not a great planner when I make something; I am more of a design as I go kind of Gal.

Making the cabochon is my first step because everything is designed around it. I made this garden Cabochon with polymer clay and mounted it in the center of a strip of stiff interfacing that measures about 2 1/2 x 8 1/2 inches. While the glue dried I picked out the beads I wanted to use to stitch the bezel. Then I stitched the bezel using a peyote Stitch.
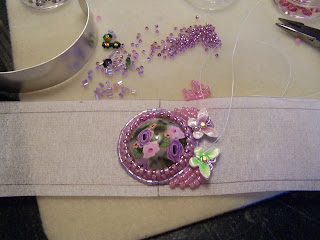

I began to embellish the cuff band with some cool accent beads I had in my bead stash. This bracelet is for The Polymer Clay Smooshers "Flight" challenge so I thought the Swarovski crystal and enamel butterflies would be perfect for that theme.


I wanted to use the beads to show motion and start to create some flow...


I started to add some green crystals and crystal flower beads to bring in the flowers from the cabochon. It's a bummer that the crystal flowers don't show well in these photos I'll make sure they show better in finished piece photos.

As I'm working I like to lay it over the brass form to make sure it's flowing and laying in a visually pleasing way. So far I am liking how it's looking .

Now I need to spend some more time finishing this side of the cuff and then start on the other side. As I do I will take more photos and post them along with the finished piece for you.

I am looking forward to entering the piece along with all of my other guild mates project in Polymer Clay Smooshers Guild "Flight" challenge. You can check out our guild blog at http://polymerclaysmooshers.blogspot.com for lots of great polymer clay information and inspiration.

Sunday, April 4, 2010

Buttons, buttons and more buttons


I use to sew a lot and I always thought buttons were the finishing touch to the project. I would search high and low for just the right buttons. I don't have to do that anymore; if I want a button I make it.

I made the cute little buttons you see with polymer clay. Each one is hand formed,sanded and buffed to a glassy sheen. they measure 15mm and are the perfect size for a blouse/shirt,scrapbooking or maybe to embellish a quilt.

I made a bunch of each for me and some to put into my Etsy and Artfire shops for others to use on their projects.

My favorites are the pinstriped ones and the gold retro patterned ones.


Today Is Easter Sunday and I am having a sale in my http://Gingerbells.ArtFire.com shop
FREE SHIPPING! on all jewelry
and
Buy 3 Get 1 FREE on all handcrafted soap bars.

Sale ends at Midnight....

Happy Easter to all !!!!!

Wednesday, March 24, 2010

What I made with my handmade beads...


I wanted to show what I made with the beads I showed in the previous post.......I like how the lavender highlights the pretty flowers and the cute little hummingbird on the pendant.

I love the way polymer clay works so well in beaded designs. It makes every piece a one of a kind piece of wearable art.

I wanted to show that I also work with gemstones on occasion. So I am showing the blue pendant and necklace I made the other night. I LOVE the pendant it is one of my all time favorites. I love how the colors work together. I also am glad I was able to work the black and blue ceramic beads into the design.

If I were honest I would say I am obsessed with beads........

Wednesday, March 17, 2010

How I make beads

.


Here is what it looks like when I am making polymer clay beads. This isn't meant to be a tutorial but more a quick look at some of what goes into making polymer clay beads.

Step 1...
pick out canes and blend base color for beads.

Step 2...
cut out and roll base beads

Step 3...
slice paper thin slices of cane and apply to base, roll to smooth.

Step 4...
cut and shape bead caps from base color. Add to beads.

Step 5....
pierce beads with bead pins hang on rack and cure..

Step 6....
when cured sand through 5 grits of sandpaper and buff to a glass like finish.

Yup I know that was a quick run through and some steps were skipped. I promise to do a proper tutorial on bead making soon.

The beads came out pretty nicely. I made a pendant base to go with them and as soon as I get the pendant beaded I'll post photos of the finished necklace.

Sunday, March 7, 2010

New on my worktable


My online clay buddy Jackie [ http://www.etsy.com/shop/ThePleasantPheasant ] has been making the most lovely canes. I couldn't resist buying some of them.

I used Jackie's awesome canes to make these very pretty pillow beads and square cabochons for beading. I love them all but if I had to pick a favorite pattern it would be the blue ones.

With the yellow set I think I'll make a bracelet with the pillows and a beaded pendant for a necklace with the cabochon.

The small green rounds and cabochon are going to be a pendant for a necklace.

The blue set will be a bracelet, necklace and pendant...

I am looking forward to designing the pendants because the square shape can be a challenge to work with and keep it soft looking.

So if you are looking to buy some awesome canes check out the link to Jackies shop I loved working with them.

Wednesday, February 3, 2010

Thing a day challenge


http://polymerclaycentral.com is having "a thing a day" challenge. We are making 1 thing a day in Febuary featuring polymer clay and posting it to the website for all to enjoy.

My day 1 project was the teardrop shaped necklace and pendant. The pendant base and the accent beads are made with polymer clay.

Day 2 project is the beads and pendant base all made with polymer clay.

Day 3 project is the beaded pendant from day 2.....

So far I am keeping up, I have the Grandkids the next couple of days so we will see.

Sunday, January 24, 2010

What is bead embroidery?


I am often asked act craft shows how I make my jewelry and I try to break it down to a simple general example. So I thought it would be fun to do on my blog too except it is more fun on the blog because I can use photos.

In today's blog I am going to talk about my favorite beading technique....bead embroidery.


Bead embroidery is a very useful technique to learn because with it you can turn a gemstone,shell,button,flat found object into a beautiful piece of jewelry. I love to use it to show off polymer clay pendant bases that I enjoy making.

To begin the pendant I glue the polymer clay base to a square piece of very stiff interfacing and while it's drying I pick out the beads I want to use from my stash.

After the glue dries with a needle and thread I sew on each bead developing the pattern. I'd like to say I start my projects will a clear vision of what it's going to look like but I don't. I usually design my projects as I make them and let the design develop naturally. [photo 1&2].

When all the base patterned beading is done I trim away all the extra interfacing and glue it to a piece of ultra suede backing hiding all the stitches and giving the pendant a a nice finished back. The next step is to stitch the 2 backings together and edge the pendant. Add a beaded bail and the pendant's done. [ photo 3&4]

Next I go through my bead stash find what I like and bead the necklace and TaDa a necklace.....

If you think you might be interested in learning more bead embroidery I recommend buying a copy of Bead and Button or Beadwork magazine and try one of the beginner projects or use the reference section to learn some of the basics to see if it's the technique for you.


Monday, January 18, 2010

What is a Polymer Clay Cane?


When people see the things I make they often think the patterns are painted on. I explain that they are made by applying thin slices of " polymer clay canes ". Then they look at me and say "what is a cane?" if you have ever had the same question here is a quick simple explanation with visual aids.

A polymer clay cane is made by blending contrasting colors of clay and forming them into a pattern. I know; it's still confusing....I'll use this simple flower cane to illustrate.

Photo #1
I took the following colors green pearl/blue pearl/white pearl and blended them together to form the striped pattern for a single flower petal and I wrapped it in a sheet of pearl clay. Then I "reduced" it; [squeezed it to make it longer] , and cut it into 8 equal lengths.

Photo #2
I took each of the 8 pieces and shaped them like a flower petal. I took the 8 petals and arranged them around a yellow center to form a flower shape.

Photo #3
I took translucent polymer clay and "packed" or wrapped it around the flower shape to help everything hold it's place during reduction.

Photo #4
I took the 3 inch wrapped and packed cane and redused it buy squeezing ,pulling and rolling it until the tube measured about 1/2 inch around and then cut it into 6 2x1/2 inch canes ready to use on projects. Just like the Pillsbury cookie dough at the store the flower pattern goes all the way through the cane.

That is how a polymer clay cane is made....Have I further confused you? I hope not; I hope I have intrigued you enough to learn to do it too.....

Friday, December 11, 2009

Polymer clay and seed beads


I think polymer clay and seed beads are a match made in heaven. They play so nicely together.

I love good gemstone cabochons but they are so expensive and really drive up the price of the pieces I make. The cabochons in the hair pins are gemstones and were expensive so I will have to sell them at a higher price point then I would like. Had I made them with polymer clay I could knock about $10 off the retail price.

Another advantage of using polymer clay is I can create some awesome stone like cabochons with awesome colors and detail for a lot less then I would pay for a natural gemstone. Using my handmade cabochons allows me to spend more money on the high quality crystals and seed beads to give my customer a higher quality product at a reasonable affordable price point.

The necklace in this post is a beautiful example. The cabochon is one that I made with polymer clay,ink,mica and gold leaf; it's full of detail and pretty colors. because the cost to make it wasn't high I was able to use a generous amount of expensive high quality Swarovski crystals and delica seed beads. By making my own cabochon I am able to offer my customer a OOAK necklace at a very reasonable price. It's a win-win situation for both of us.