Showing posts with label handmade. Show all posts

Wednesday, July 28, 2010

Where the Wild Things Are


{Tiger pattern Bangle bracelet}

I have been going Tiger crazy the last week or two..
I learned to make this tiger pattern from polymer clay and I like it so much I designed a mini collection around it.
I thought I'd share my mini obsession with you.

{round 2 hole tiger buttons}

{Wild Thing Necklace}
The necklace is my favorite piece in the collection I think it's beautiful if I do say so myself.

{square link bracelet}

This is the newest piece in the collection, I like it alot too. I tried it on and it's a comfortable bracelet to wear because it's adjustable.

I have a couple of other designs for this collection in the works and then maybe I'll have it out of my system,lol.

All of the pieces in this post can be found split between my 2 online gift shops.
Http://Gingerbells.artfire.com or http://Gingerbells.1000markets.com
if you are interested or want to see more photos of these pieces check them out.

Monday, April 19, 2010

How to make a cuff bracelet part 2


So I finished doing all the stitching on the front of the bracelet and I think it looks cute so far now it's time to put it all together.
I sandwiched the front ,brass cuff form and suede backing together then I stitched them all together with a picot edging stitch.

So here is a top view of finished cuff

side view

close up side view

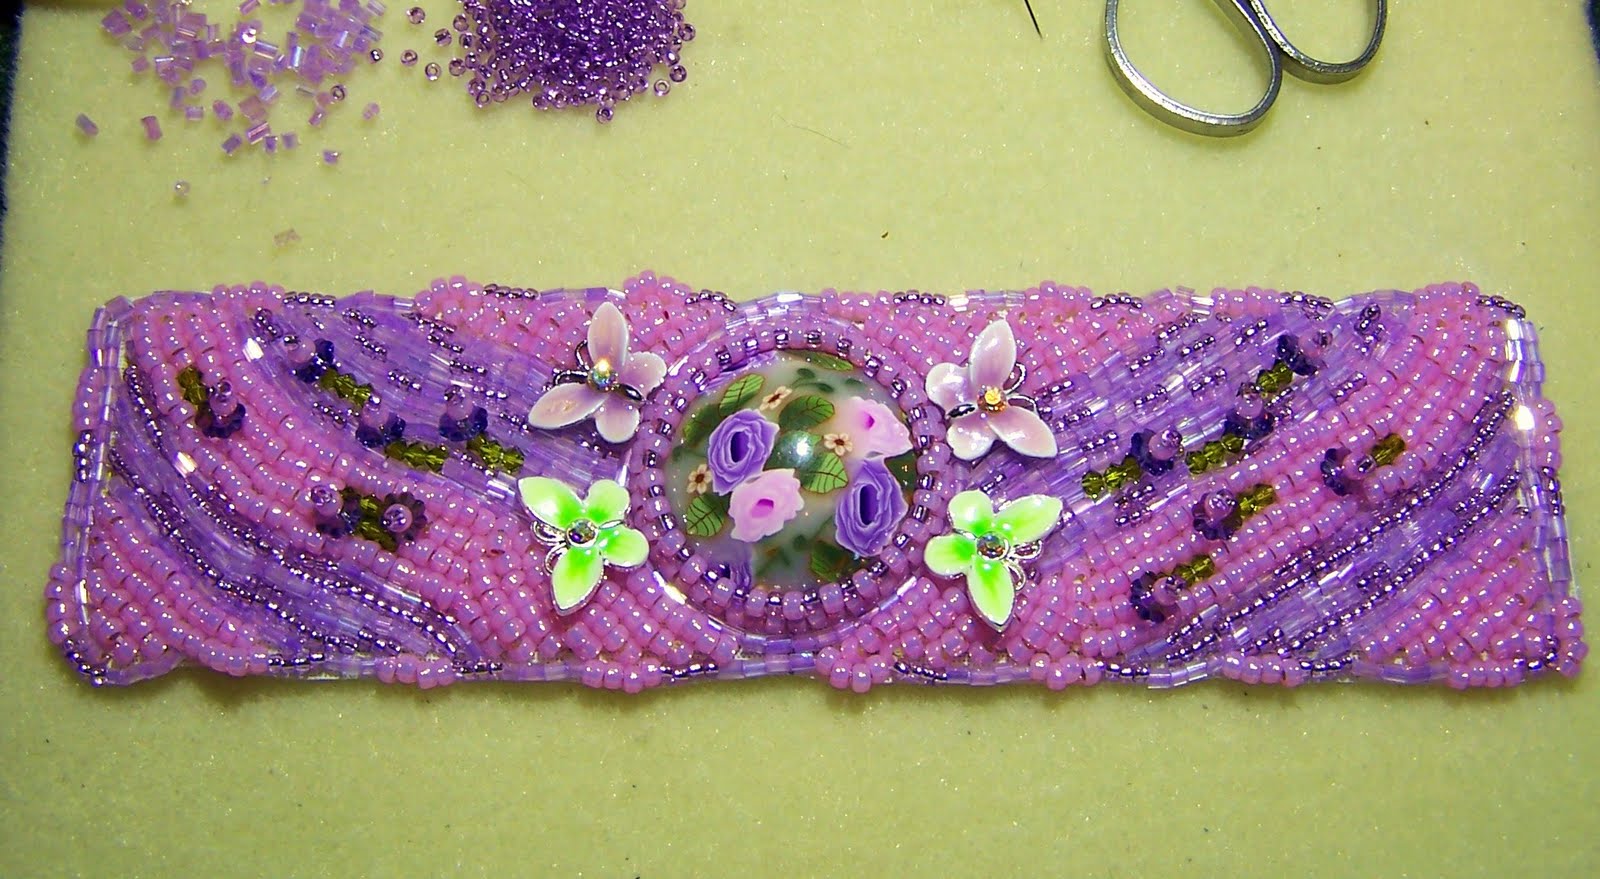
and here is the glamor shot of the finished bracelet cuff. It measures 2 inches wide and is about 7 1/4 inches long it can be adjusted to fit most wrist sizes even my fat little wrist.
The center cabochon is polymer clay,the butterflies are enameled with Swarovski crystals. The rest of the beads are Japanese seed beads and Swarovski crystals. the sparkle is awesome to bad that doesn't show up well in photos.

Over all I am happy with the end result of course like any other "artist" I see lots of thing I would do differently.

So there ya go this is my entry for The Polymer Clay Smooshers flight theme challenge........What do you think?

Sunday, April 11, 2010

How to make a cuff bracelet


I wanted to do a work in progress post for anyone interested in making a cuff bracelet or just wondered how they were made. I thought I'd show how I made one.

I am not a great planner when I make something; I am more of a design as I go kind of Gal.

Making the cabochon is my first step because everything is designed around it. I made this garden Cabochon with polymer clay and mounted it in the center of a strip of stiff interfacing that measures about 2 1/2 x 8 1/2 inches. While the glue dried I picked out the beads I wanted to use to stitch the bezel. Then I stitched the bezel using a peyote Stitch.


I began to embellish the cuff band with some cool accent beads I had in my bead stash. This bracelet is for The Polymer Clay Smooshers "Flight" challenge so I thought the Swarovski crystal and enamel butterflies would be perfect for that theme.


I wanted to use the beads to show motion and start to create some flow...


I started to add some green crystals and crystal flower beads to bring in the flowers from the cabochon. It's a bummer that the crystal flowers don't show well in these photos I'll make sure they show better in finished piece photos.

As I'm working I like to lay it over the brass form to make sure it's flowing and laying in a visually pleasing way. So far I am liking how it's looking .

Now I need to spend some more time finishing this side of the cuff and then start on the other side. As I do I will take more photos and post them along with the finished piece for you.

I am looking forward to entering the piece along with all of my other guild mates project in Polymer Clay Smooshers Guild "Flight" challenge. You can check out our guild blog at http://polymerclaysmooshers.blogspot.com for lots of great polymer clay information and inspiration.

Sunday, April 4, 2010

Buttons, buttons and more buttons


I use to sew a lot and I always thought buttons were the finishing touch to the project. I would search high and low for just the right buttons. I don't have to do that anymore; if I want a button I make it.

I made the cute little buttons you see with polymer clay. Each one is hand formed,sanded and buffed to a glassy sheen. they measure 15mm and are the perfect size for a blouse/shirt,scrapbooking or maybe to embellish a quilt.

I made a bunch of each for me and some to put into my Etsy and Artfire shops for others to use on their projects.

My favorites are the pinstriped ones and the gold retro patterned ones.


Today Is Easter Sunday and I am having a sale in my http://Gingerbells.ArtFire.com shop
FREE SHIPPING! on all jewelry
and
Buy 3 Get 1 FREE on all handcrafted soap bars.

Sale ends at Midnight....

Happy Easter to all !!!!!

Wednesday, March 24, 2010

What I made with my handmade beads...


I wanted to show what I made with the beads I showed in the previous post.......I like how the lavender highlights the pretty flowers and the cute little hummingbird on the pendant.

I love the way polymer clay works so well in beaded designs. It makes every piece a one of a kind piece of wearable art.

I wanted to show that I also work with gemstones on occasion. So I am showing the blue pendant and necklace I made the other night. I LOVE the pendant it is one of my all time favorites. I love how the colors work together. I also am glad I was able to work the black and blue ceramic beads into the design.

If I were honest I would say I am obsessed with beads........

Wednesday, March 17, 2010

How I make beads

.


Here is what it looks like when I am making polymer clay beads. This isn't meant to be a tutorial but more a quick look at some of what goes into making polymer clay beads.

Step 1...
pick out canes and blend base color for beads.

Step 2...
cut out and roll base beads

Step 3...
slice paper thin slices of cane and apply to base, roll to smooth.

Step 4...
cut and shape bead caps from base color. Add to beads.

Step 5....
pierce beads with bead pins hang on rack and cure..

Step 6....
when cured sand through 5 grits of sandpaper and buff to a glass like finish.

Yup I know that was a quick run through and some steps were skipped. I promise to do a proper tutorial on bead making soon.

The beads came out pretty nicely. I made a pendant base to go with them and as soon as I get the pendant beaded I'll post photos of the finished necklace.

Sunday, March 7, 2010

New on my worktable


My online clay buddy Jackie [ http://www.etsy.com/shop/ThePleasantPheasant ] has been making the most lovely canes. I couldn't resist buying some of them.

I used Jackie's awesome canes to make these very pretty pillow beads and square cabochons for beading. I love them all but if I had to pick a favorite pattern it would be the blue ones.

With the yellow set I think I'll make a bracelet with the pillows and a beaded pendant for a necklace with the cabochon.

The small green rounds and cabochon are going to be a pendant for a necklace.

The blue set will be a bracelet, necklace and pendant...

I am looking forward to designing the pendants because the square shape can be a challenge to work with and keep it soft looking.

So if you are looking to buy some awesome canes check out the link to Jackies shop I loved working with them.

Sunday, January 24, 2010

What is bead embroidery?


I am often asked act craft shows how I make my jewelry and I try to break it down to a simple general example. So I thought it would be fun to do on my blog too except it is more fun on the blog because I can use photos.

In today's blog I am going to talk about my favorite beading technique....bead embroidery.


Bead embroidery is a very useful technique to learn because with it you can turn a gemstone,shell,button,flat found object into a beautiful piece of jewelry. I love to use it to show off polymer clay pendant bases that I enjoy making.

To begin the pendant I glue the polymer clay base to a square piece of very stiff interfacing and while it's drying I pick out the beads I want to use from my stash.

After the glue dries with a needle and thread I sew on each bead developing the pattern. I'd like to say I start my projects will a clear vision of what it's going to look like but I don't. I usually design my projects as I make them and let the design develop naturally. [photo 1&2].

When all the base patterned beading is done I trim away all the extra interfacing and glue it to a piece of ultra suede backing hiding all the stitches and giving the pendant a a nice finished back. The next step is to stitch the 2 backings together and edge the pendant. Add a beaded bail and the pendant's done. [ photo 3&4]

Next I go through my bead stash find what I like and bead the necklace and TaDa a necklace.....

If you think you might be interested in learning more bead embroidery I recommend buying a copy of Bead and Button or Beadwork magazine and try one of the beginner projects or use the reference section to learn some of the basics to see if it's the technique for you.


Monday, January 18, 2010

What is a Polymer Clay Cane?


When people see the things I make they often think the patterns are painted on. I explain that they are made by applying thin slices of " polymer clay canes ". Then they look at me and say "what is a cane?" if you have ever had the same question here is a quick simple explanation with visual aids.

A polymer clay cane is made by blending contrasting colors of clay and forming them into a pattern. I know; it's still confusing....I'll use this simple flower cane to illustrate.

Photo #1
I took the following colors green pearl/blue pearl/white pearl and blended them together to form the striped pattern for a single flower petal and I wrapped it in a sheet of pearl clay. Then I "reduced" it; [squeezed it to make it longer] , and cut it into 8 equal lengths.

Photo #2
I took each of the 8 pieces and shaped them like a flower petal. I took the 8 petals and arranged them around a yellow center to form a flower shape.

Photo #3
I took translucent polymer clay and "packed" or wrapped it around the flower shape to help everything hold it's place during reduction.

Photo #4
I took the 3 inch wrapped and packed cane and redused it buy squeezing ,pulling and rolling it until the tube measured about 1/2 inch around and then cut it into 6 2x1/2 inch canes ready to use on projects. Just like the Pillsbury cookie dough at the store the flower pattern goes all the way through the cane.

That is how a polymer clay cane is made....Have I further confused you? I hope not; I hope I have intrigued you enough to learn to do it too.....

Friday, December 11, 2009

Polymer clay and seed beads


I think polymer clay and seed beads are a match made in heaven. They play so nicely together.

I love good gemstone cabochons but they are so expensive and really drive up the price of the pieces I make. The cabochons in the hair pins are gemstones and were expensive so I will have to sell them at a higher price point then I would like. Had I made them with polymer clay I could knock about $10 off the retail price.

Another advantage of using polymer clay is I can create some awesome stone like cabochons with awesome colors and detail for a lot less then I would pay for a natural gemstone. Using my handmade cabochons allows me to spend more money on the high quality crystals and seed beads to give my customer a higher quality product at a reasonable affordable price point.

The necklace in this post is a beautiful example. The cabochon is one that I made with polymer clay,ink,mica and gold leaf; it's full of detail and pretty colors. because the cost to make it wasn't high I was able to use a generous amount of expensive high quality Swarovski crystals and delica seed beads. By making my own cabochon I am able to offer my customer a OOAK necklace at a very reasonable price. It's a win-win situation for both of us.

Monday, November 30, 2009

Here are some new pieces.....


It has been awhile since my last post as usual it's been busy at the Casa de Gonzalez....Some good things and some bad things.....
Let's get the bad news out before I get on to the good...
My beloved Father in law Jose Gonzalez Sr. lost his battle with cancer last month. He was a strong loving man who along with his wife of 56 years raised 5 awesome children one of whom is my dear Husband Jose Jr. He was a strong courageous man who over the last year dealt with learning of his illness,loosing the love of his life in February and the progression of his illness leading to his death. He was an example of grace and dignity, strength and hope. I loved and admired him very much and will miss him.

This year has been very hard for our family we have lost so much, both of my husband's parents and my Mom. But we have also gained through our losses. I have learned that above all else the people I love are the most important thing and that the love in my heart didn't die with them perhaps it has grown even stronger. I have learned that every second on this earth is a gift that I will never again take for granted.


Ok so now for the happier news......
My little Granddaughter Lexipoo turned 1 she is growing way to fast and has her Grandpa Jose enchanted.....
and...........
One day while Jose was out in the woods he found a little Chihuahua who had been abandoned deep in the woods he was 1/2 starved and lost a lot of his hair from a flea infestation. The poor little guy begged Jose to help him and he couldn't resist bringing him home.

We took him to the Vet the next day to see what he needed to get healthy and see if they could help us find out who he belongs to. The Vet said it was a good thing for him that we found him because he wouldn't have made it long the way he was. He needed food and de- flea-ed and he had ear mites. The worst thing is the vet said he had been abused and mistreated and that the people hadn't had him neutered and allowed his testicles to grow up into his belly. The Vet said we could have them removed in the future and that would help him a lot.

Well we never found his old owners and we have had him about a month now. We named him Chuy; he is happy has gained almost 2 lb's and his hair is growing in nicely, the fleas and ear mites are gone. He has a new dog house and plush bed in the garage that he like so well he spends a lot of time snuggled up in snoozing. He is such a sweet lovable little creature he likes cats and kids. I can't imagine why someone would have been so mean to him but he will never have to worry about that again.

The next hurdle for Chuy is the operation on his boy parts. After he has that the vet feels like he'll be fine. Right now one of the testicles is pushing on his bladder so he sometimes can't control his peeing so after it's done I will work on housebreaking him so he can come in the house. I have never had a dog before so this has been an experience for us.

also......
My 10 day craft show in October went really, really well so I have been working hard to replenish my inventory. I posted a few of my new pieces here on my blog.

also.....
I am having a sale in my ArtFire studio http://Gingerbells.artfire.com
10% off all items +
FREE SHIPPING on all orders over $20.00
this sale will run for the next week.

Monday, September 21, 2009

Victorian Poinsettia Brooches


I have always liked Victorian styled things around the holidays. I think these 2 brooches have a Victorian look to them.

When I started making them the other day I had intended for them to be pendants on necklaces. By the time I finished the beading and making the ruffles edges they were way to big for pendants. So.....brooches they became. In the end I think it worked out for the best. I'll take the beads I made for the necklaces and turn them into a bracelet and earrings.

The soft diamond one is my favorite. I like how the champagne beads and black opal seed bead ruffle frame the bezel.

on work table......earrings, earrings and more earrings......